
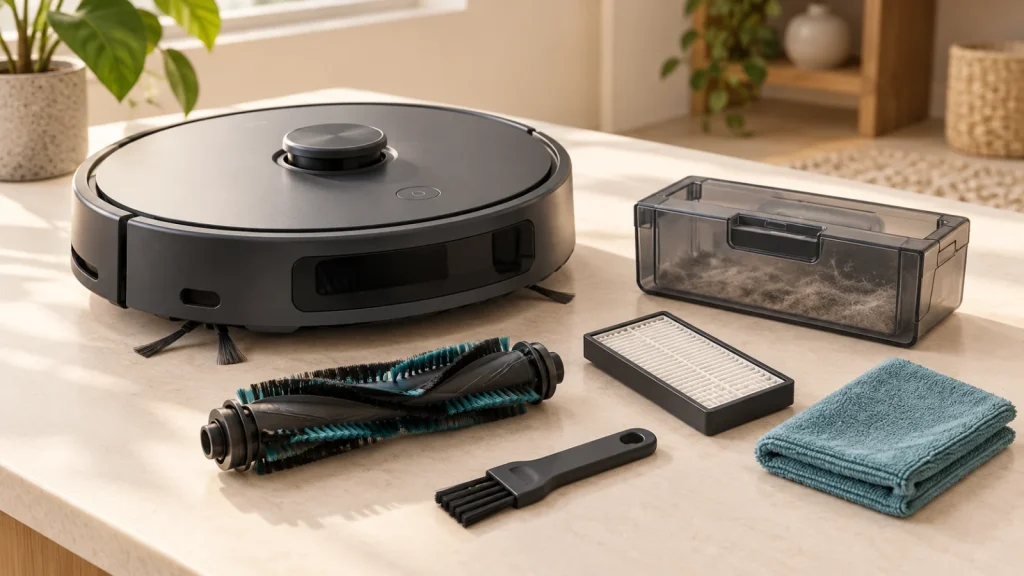
To clean a robot vacuum, stop it, switch it off as directed by its manual, empty the bin and remove accessible debris from the cleaning head. Clean the filter using its specific instructions, then wipe the appropriate sensor windows and charging contacts with the recommended cloth. Reassemble everything correctly before testing the robot.
The most important distinction is what may be washed. A washable dustbin does not make its filter, motor, charging contacts or the rest of the robot washable. Some filters must stay dry. Identify the exact part and model before using water, detergent or a cleaning tool.
Start with the manual and a small set of tools
Read the routine-maintenance section for your exact model. It should identify owner-removable parts, release tabs or screws, approved cleaning methods and drying requirements. A part that looks similar to another brand’s component can have different instructions.
Gather a soft, clean cloth, the supplied cleaning tool and a suitable container for debris. Use additional tools only where the manual permits them. For example, a brush may be appropriate for a detached roller while being unsuitable for the surface of a delicate filter.
Stop any active cleaning job before handling the underside. Follow the manual’s shutdown procedure and disconnect the dock from mains power before cleaning its contacts. Eufy’s 11S/11S MAX manual includes shutdown and electrical precautions for maintenance; the linked readable copy is manufacturer-authored but hosted by a third party.
Choose a dry, stable working surface. Keep track of small removable pieces, and take a reference photo before disassembly if their orientation is not obvious. Routine care should not require opening sealed electronics or improvising repairs to the battery or charging system.
1. Empty the bin and check the debris path
Remove the bin using its documented release, open it over a suitable container and empty the contents. Check the opening between the cleaning head and bin for an accessible blockage. A clear-looking bin does not rule out material trapped in that passage.
Inspect the bin’s lid, latches and visible seals. A component that has not closed correctly can affect normal operation, and a cracked or damaged part needs the remedy specified by the manufacturer. Do not assume washing will repair a poor seal or broken latch.
Only rinse a bin if its instructions allow it, and remove parts that must remain dry first. iRobot’s Roomba s9 care guidance, for example, distinguishes a hand-rinsable bin from a filter that must not encounter liquid. That distinction applies to the specified components, not every Roomba or every bin.
Leave rinsed parts to dry completely according to the manual before reinstalling them. Do not put a robot back to work just because the exterior of a component looks dry. Check folds, corners and recesses that can retain moisture.
2. Remove hair from the main brush roll
Open the brush guard or cleaning-head cover as directed and lift out the roller if it is designed for owner removal. Note which end fits the drive connection and how any removable cap or bearing is positioned.
Remove loose hair and thread from the visible roller surface using the approved tool. If a cutting tool is authorized, keep it away from bristles, rubber elements, seals and cables. Pulling tightly wrapped material without first freeing it can make removal harder or damage the assembly.
Inspect the ends as well as the middle. Hair can gather where a roller meets its supports even when the visible cleaning surface looks clear. Do not pry off a cap unless the manufacturer identifies it as removable.
Before reinstalling, check the brush guard and the cavity around it for accessible debris. Seat the roller in the correct orientation and close the guard securely. An incorrectly fitted brush can create a new problem immediately after an otherwise careful clean.
A rubber roller is not automatically washable, and a bristle roller is not automatically dry-clean-only. Follow the exact component’s instructions. If you need help identifying the design, our brush-roll comparison explains rollers, side brushes and suction-only openings.
3. Clean side brushes and accessible wheels
Side brushes may use a screw, clip or another attachment. Follow the removal method shown in your manual, including left/right markings where provided. Inspect for hair around the center, and look for bent, split or heavily worn cleaning elements.
Check the caster wheel and accessible drive-wheel areas for wound hair or visible obstruction. Some wheel assemblies are owner-removable; others are not. Clean only the areas and components the manual identifies for routine care rather than forcing a wheel out because another robot’s wheel detaches that way.
Keep the removed parts together while cleaning. Reinstalling the wrong brush on a marked side or leaving a cap out can turn a simple maintenance task into a cleaning or movement fault. If a part does not sit properly, stop and compare it with the diagram before running the robot.
A suction-only vacuum still needs these checks. Removing the central brush roll from the design does not remove side-brush, wheel, inlet and bin maintenance.
4. Clean the filter according to its own washing rule
Read the filter label and model instructions before choosing a method. Different layers in one bin can have different rules. Keep the high-performance element separate from a washable pre-filter or foam piece where the design uses them.
For a dry-only filter, use the manufacturer’s stated method to remove loose dust. Do not scrub the filter medium or assume that soaking it will restore it. ILIFE’s V2 FAQ expressly says its high-performance filter must not be washed. Treat a damaged element according to the manufacturer’s replacement guidance.
Other components have different requirements. The Roborock Q7 M5 CE English manual identifies a washable filter, describes rinsing it and requires at least 24 hours of thorough drying before reinstallation. That is a model-and-version example, not a universal drying time or permission to wash another robot’s filter.
If washing is allowed, follow the permitted water, detergent and handling instructions exactly. “Washable” does not automatically mean dishwasher-safe, suitable for hot water or safe to dry with heat. When the instructions are unclear, ask the manufacturer using the filter’s exact part number.
Do not test cleaning performance with the filter missing. Use the specified filter, correctly installed and dry, before returning the robot to service.
5. Wipe the relevant sensors gently
Use the manual’s diagram to identify sensor locations. Depending on the model, these can include underside cliff sensors, a side-facing wall sensor, a front window, a camera or a laser-ranging assembly. They do not all have the same function or cleaning access.
Where the manufacturer specifies a soft dry cloth, use that method rather than spraying cleaner onto the robot. For example, Eufy’s Omni E35 docking guidance calls for gently wiping sensor windows with a dry cloth. Its G-series alert guide also identifies a dirty path-tracking sensor as a possible fault condition.
Remove surface dust without applying force, scratching a window or inserting a tool into the sensor assembly. Do not dismantle a LiDAR housing as part of ordinary wiping unless the manufacturer explicitly provides that owner procedure.
Never cover or disable cliff sensors to make a robot cross a surface it avoids. A surface-related detection problem and a dirty sensor are different diagnoses. If cleaning does not resolve the behavior, seek model-specific guidance rather than bypassing protection.
Our robot-vacuum navigation explanation shows why route planning, mapping and protective sensing should be assessed separately.
6. Clean the charging contacts and dock area
With the dock disconnected as directed, gently wipe the robot’s and dock’s charging contacts using the specified dry cloth. Avoid introducing moisture or using abrasive or corrosive products on them. Eufy’s S1 Pro charging guidance specifically advises dry cleaning and avoiding corrosive agents for its contacts.
Check the visible dock area for loose debris and make sure the dock sits as the manual requires. A shifted base or blocked approach can complicate docking even when the metal contacts are clean. Reconnect the dock only after everything is correctly assembled and ready for use.
Do not assume this procedure addresses a damaged cable, loose socket or charging-electronics fault. If something appears damaged, stop using the affected equipment and follow the manufacturer’s support instructions.
7. Reassemble and run a supervised check
Confirm that the bin, filter, brush, caps and guard are present and fitted correctly. Ensure every approved rinsed component is fully dry. Remove tools from the floor and return the robot to the normal setup described in its manual.
Start a short, supervised clean in a manageable area. Listen for a new noise, watch for an error and check whether the brush guard and bin remain secure. Then use the documented docking command and confirm the robot indicates charging normally.
If a new problem appears immediately after maintenance, recheck assembly first. Repeatedly running a poorly seated brush is less useful than finding the installation error. If the fault persists after the documented checks, record the error message and contact support.
For a robot with a local timer, also check whether shutting it down affected the routine. Our offline scheduling tutorial covers the distinction between an operating fault and a schedule that needs setting again.
Build a maintenance routine around actual use
Begin with the intervals in your model’s manual, then inspect more often if debris accumulates sooner. Eufy’s accessory-care chart distinguishes cleaning from replacement and notes that frequency depends on use. Do not turn one brand’s chart into a universal schedule for all robots.
A practical household routine is to inspect the bin and visible cleaning head when you empty it, then keep a separate reminder for the manual’s less frequent sensor and wheel checks. Pet shedding, long hair and the amount of dirt tracked indoors can make that inspection especially useful. If hair tangles and shedding make maintenance a frequent chore, our robot vacuums for pet hair comparison explains which designs address those problems.
Record the date when a consumable was replaced and note visible wear. A reminder can help you inspect a part, but its calendar age does not override damage, restricted airflow or the manufacturer’s required replacement advice.
When cleaning is not enough
| Symptom | Useful owner check | When to seek further help |
|---|---|---|
| Debris remains or falls back out | Bin, accessible inlet, filter and brush installation | Performance remains poor after documented care |
| New clicking or scraping | Trapped material and brush seating | Noise persists or a component is damaged |
| Movement becomes unusual | Visible wheel obstruction and appropriate sensor cleaning | An error repeats or movement remains abnormal |
| Docking or charging becomes unreliable | Dock position, approach and dry contact cleaning | Normal charging cannot be confirmed |
These checks identify places to look; they do not prove that every symptom is caused by dirt. Eufy’s debris-dropping troubleshooting guidance includes obstruction, damaged consumables and incorrect installation among the possibilities.
The aim is a clean, correctly assembled robot with its protective functions intact. Use the exact manual, preserve the distinction between washable and dry-only parts, and confirm normal operation before returning to an unattended routine.

Ryan Hayes
Founder & EditorRyan Hayes is the founder and editor of Smart Space Advisor, where he researches and evaluates smart home technology to help readers make informed buying decisions. His work focuses on smart security, video doorbells, smart plugs, lighting, and connected-home platforms including Matter, Alexa, Google Home, and Apple Home. By combining product research, manufacturer documentation, feature comparisons, and real-world considerations, Ryan aims to cut through technical jargon and provide practical, straightforward advice about which smart home products offer genuine value.